Restore RDS backup
This guide shows you how to restore a database backup to a new database cluster.
Before you begin
You need to:
- Complete Configure AWS Backup
- Have at least one snapshot available (by default a database backup is completed nightly)
- Configure RDS bastion to be able to verify your restored database
- Have
psqlinstalled to connect to your database
Step 1: Find a backup to restore
You can perform a point-in-time or snapshot recovery. A point-in-time recovery is essentially a snapshot recovery with the database transaction log replayed on top afterwards. Such a recovery can take a bit longer, but will restore your cluster to a more recent state.
Start by opening the AWS console, finding the Amazon RDS service, opening Automated backups and clicking on the RDS cluster you want to restore:
- For point-in-time recovery: Click the Actions dropdown and select Restore to point in time.
- For snapshot recovery: Click on the snapshot you want to restore from (optionally clicking on the Creation time column header to sort them by date). Click the Actions dropdown and select Restore snapshot.
Tip
If you want to restore from a manually created snapshot, you can do that by opening Snapshots in the left hand menu, selecting the Manual pane and clicking on the snapshot you want to restore from. The remaining steps are the same as for automatic backups.
Step 2: Configure your new database
If this is a point-in-time recovery, start by selecting the time to restore from.
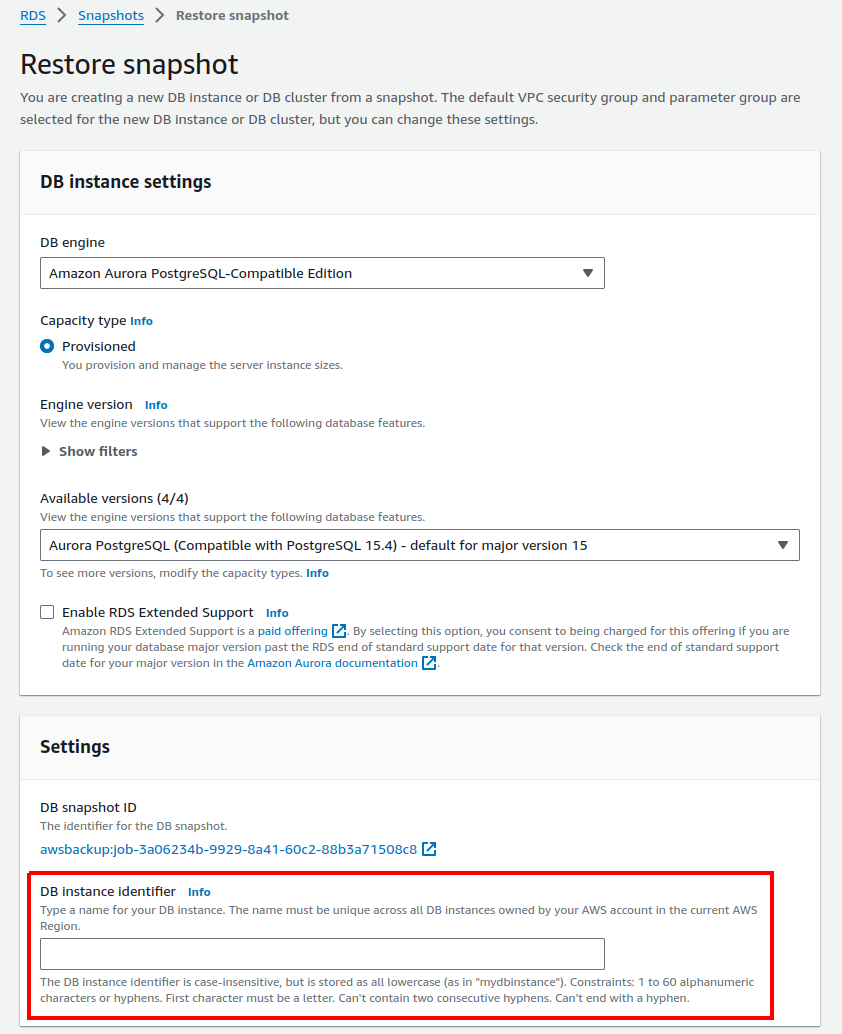
Under Settings provide a name for the new database cluster under DB instance identifier. The default from Golden Path is ${local.environment}-main (e.g., pirates-dev-main).

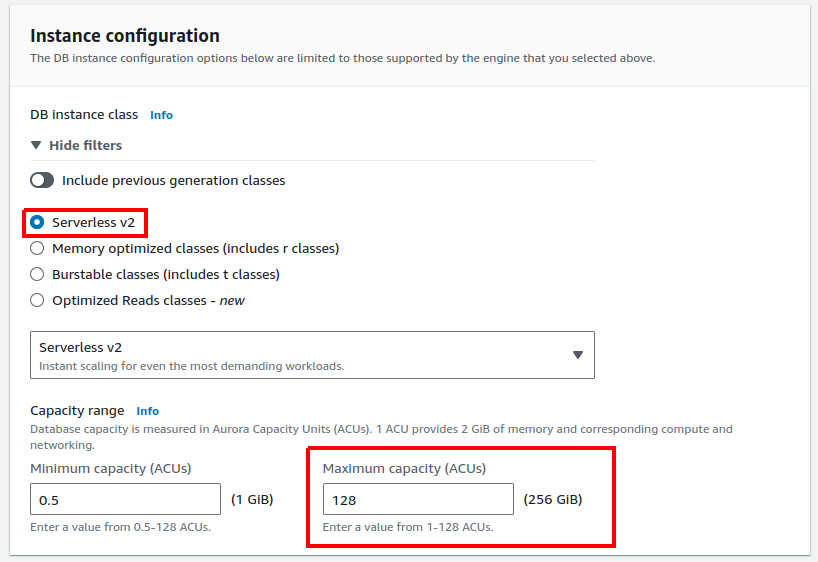
Under Instance configuration select "Serverless v2". Update "Maximum capacity (ACUs)" as needed.

Under Connectivity ensure that the VPC, subnet group and security groups are the same as for your existing DB instance, and do not have default in their IDs or names.
Tip
You can find the details of your existing DB cluster and instance under Amazon RDS > Databases and by clicking on the cluster or the instance. Connectivity details can, as an example, be found by clicking at the instance and looking at the details under the Connectivity & security pane.
Under Additional configuration:
- Ensure that the DB cluster parameter group is the same as the DB cluster you are restoring from.
- Ensure that Deletion protection is enabled.
Finally, click Restore DB cluster or Restore to point in time, depending on recovery type. Restoring a database takes some time (approx. 30min for an empty database). While restoring the database will be listed as creating. Before continuing the database status must be "Available".
Step 3: Verify database backup
Assumption
In order to do this step you must already have RDS bastion configured. If you do not have RDS bastion configure, see Connect to a database from your computer
Using the ok tool enable access to the database from your local machine with:
In another terminal type:
The master password will be the same as for the old database. If you do not know the old password, you can update it to a known value from the console Amazon RDS > Databases > (Select restored DB) > (Modify). Set a new master password and apply the configuration.
You should now be able to verify that the content of your database is as expected and can proceed to connect your application to the new database.
Step 4: Connect app to new database
This step assumes that you are following the Golden Path and details may vary depending on your setup.
In your application stack, create a new SSM parameter as follows:
resource "aws_ssm_parameter" "db_endpoint" {
  name  = "/${local.environment}/database/${local.db_name}/restored_db_endpoint"
  type  = "String"
  value = "To be set in console"
  tags  = local.common_tags

  lifecycle {
    ignore_changes = [
      value
    ]
  }
}
Create the new resource by running terraform apply.
Locate the database endpoint in the console under Amazon RDS > Databases > (Select your restored DB instance). Copy the database endpoint.
Update the value of the newly created parameter under AWS Systems Manager > Parameter Store > (Search for restored_db_endpoint).
Step 5: Update the App DB endpoint
Create a new file called __gp_dependencies_override.tf with the following:
data "aws_ssm_parameter" "db_endpoint" {
  name            = "/${local.environment}/database/${local.db_name}/restored_db_endpoint"
  with_decryption = false
}
Run terraform apply again to update your application.
Next step
Warning
The above approach assumes that the username and password for the database will remain the same. If you rotate the password on the old database you will experience connectivity issues with the restored database.
Once you have restored your application to a working state you should import the new database into your Terraform configuration for easier management.